IoT Hackathon
I have been looking into Raspberry Pis and Arduinos for a few years, and this year I decided I want to share these things among my colleagues. The first idea was a small (max 5 person) little workshop that quickly grew into a hackathon that took some time to plan and organize.
In the end 13 people registered to the event from my own and three other companies that we work closely together with (Offbeat Solutions, Avarko, Cloud1 and Devisioona). On board with both Windows IoT Core and Raspbian. Our companies sponsored this event as a way to learn about new technologies.
The logo of Devisioona on the Sense HAT
Gathering resources
Preparation started with drafting a few project ideas and at the same time measuring interest in the event. I wrote up some ideas, and also wrote what parts would be required for these ideas. Based on this, I compiled a list of components that we would need to build all those projects.
Some components I could order from Amazon or from local stores. But the HATs and Raspberry Pi kits are not that easy to purchase here in Finland.
I decided to go with Adafruit Windows IoT Starter pack, because it would have components that work with Windows IoT Core out of the box. Although I was going to have people who use Raspbian as well, the starter kit would guarantee that both userbase could work flawlessly. The kit also helped me because I did not have to order all those things separately.
I asked Pimoroni if they could get the Adafruit packs for us, and they could. So I ordered a big box of goodies from them. Big thanks to them for getting me all these components and shipping them to us. (and thanks for the lots of bubble wraps as well, we had a bring your kids to work day just before the Hackathon, and all our kids enjoyed popping the bubble wraps! 🙂 )

Almost feels like Christmas
Final preparations
When my box of goodies arrived, I had to setup all of the SD cards so we could start working right away, instead of going through OS setup. This was a very good decision. Although it took some of my own time beforehand, there was no time wasted at the event to setup things.
For Raspbian, I used the tool called PiBakery to setup SD cards. I set up separate host names for all SD cards (based on mythological names), preset WiFi settings and burned the cards. I also made sure they have the latest updates installed.
For Windows IoT Core it was not as simple. I still performed the setup and hostname assignment, but I could not setup the WiFi. For Windows, you need to have access to the WiFi network to set it up, and I did not have access to our place with the Raspberries before the actual event. (It might be possible to perform Wifi setup without access to the Wifi network, but it is complicated, and I did not have time to investigate).
When all SD cards were ready, I labeled all the starter pack boxes, put all my separate accessories into the big box. And waited for the big day.
Last minute power-distress
One thing that completely missed me was that by buying the Adafruit kits from the US, they came with Micro USB chargers that had the US power plugs. So I had to emergency order some plug converters so we could have the power supplies plugged into the EU style power outlets 🙂 Luckily the shipment arrived on the day before the event.
Event day
I headed first to our office, because I forgot to draw a map of how to get in to the building, and I also had to print some GPIO pin charts. I was already running out of time, so I was very happy my notebook has a digitizer pen, I quickly draw something, and it was already in the computer, so it was easy to share.
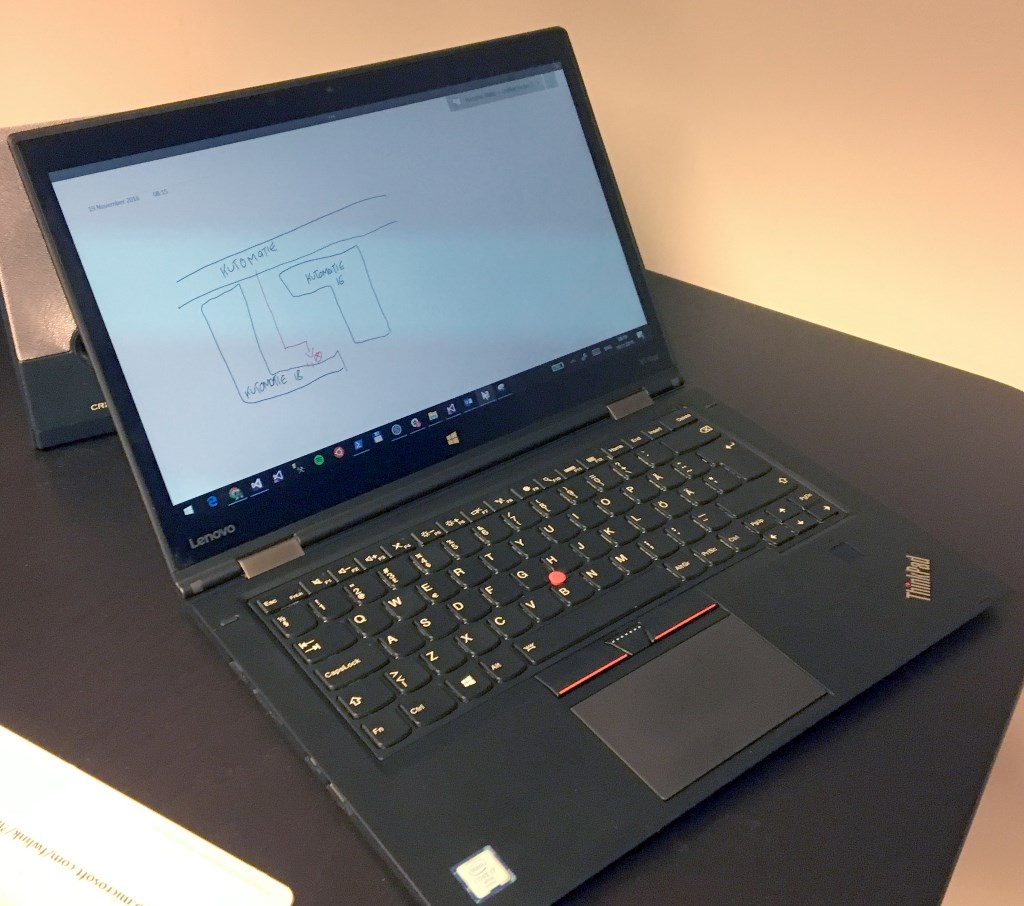
Digital map
Then it was exercise time, taking all the stuff (boxes) and food&drinks to the event place. Thank you for @mattipet for the help in this phase! Then it was unboxing time. All these components made for an impressive table display.
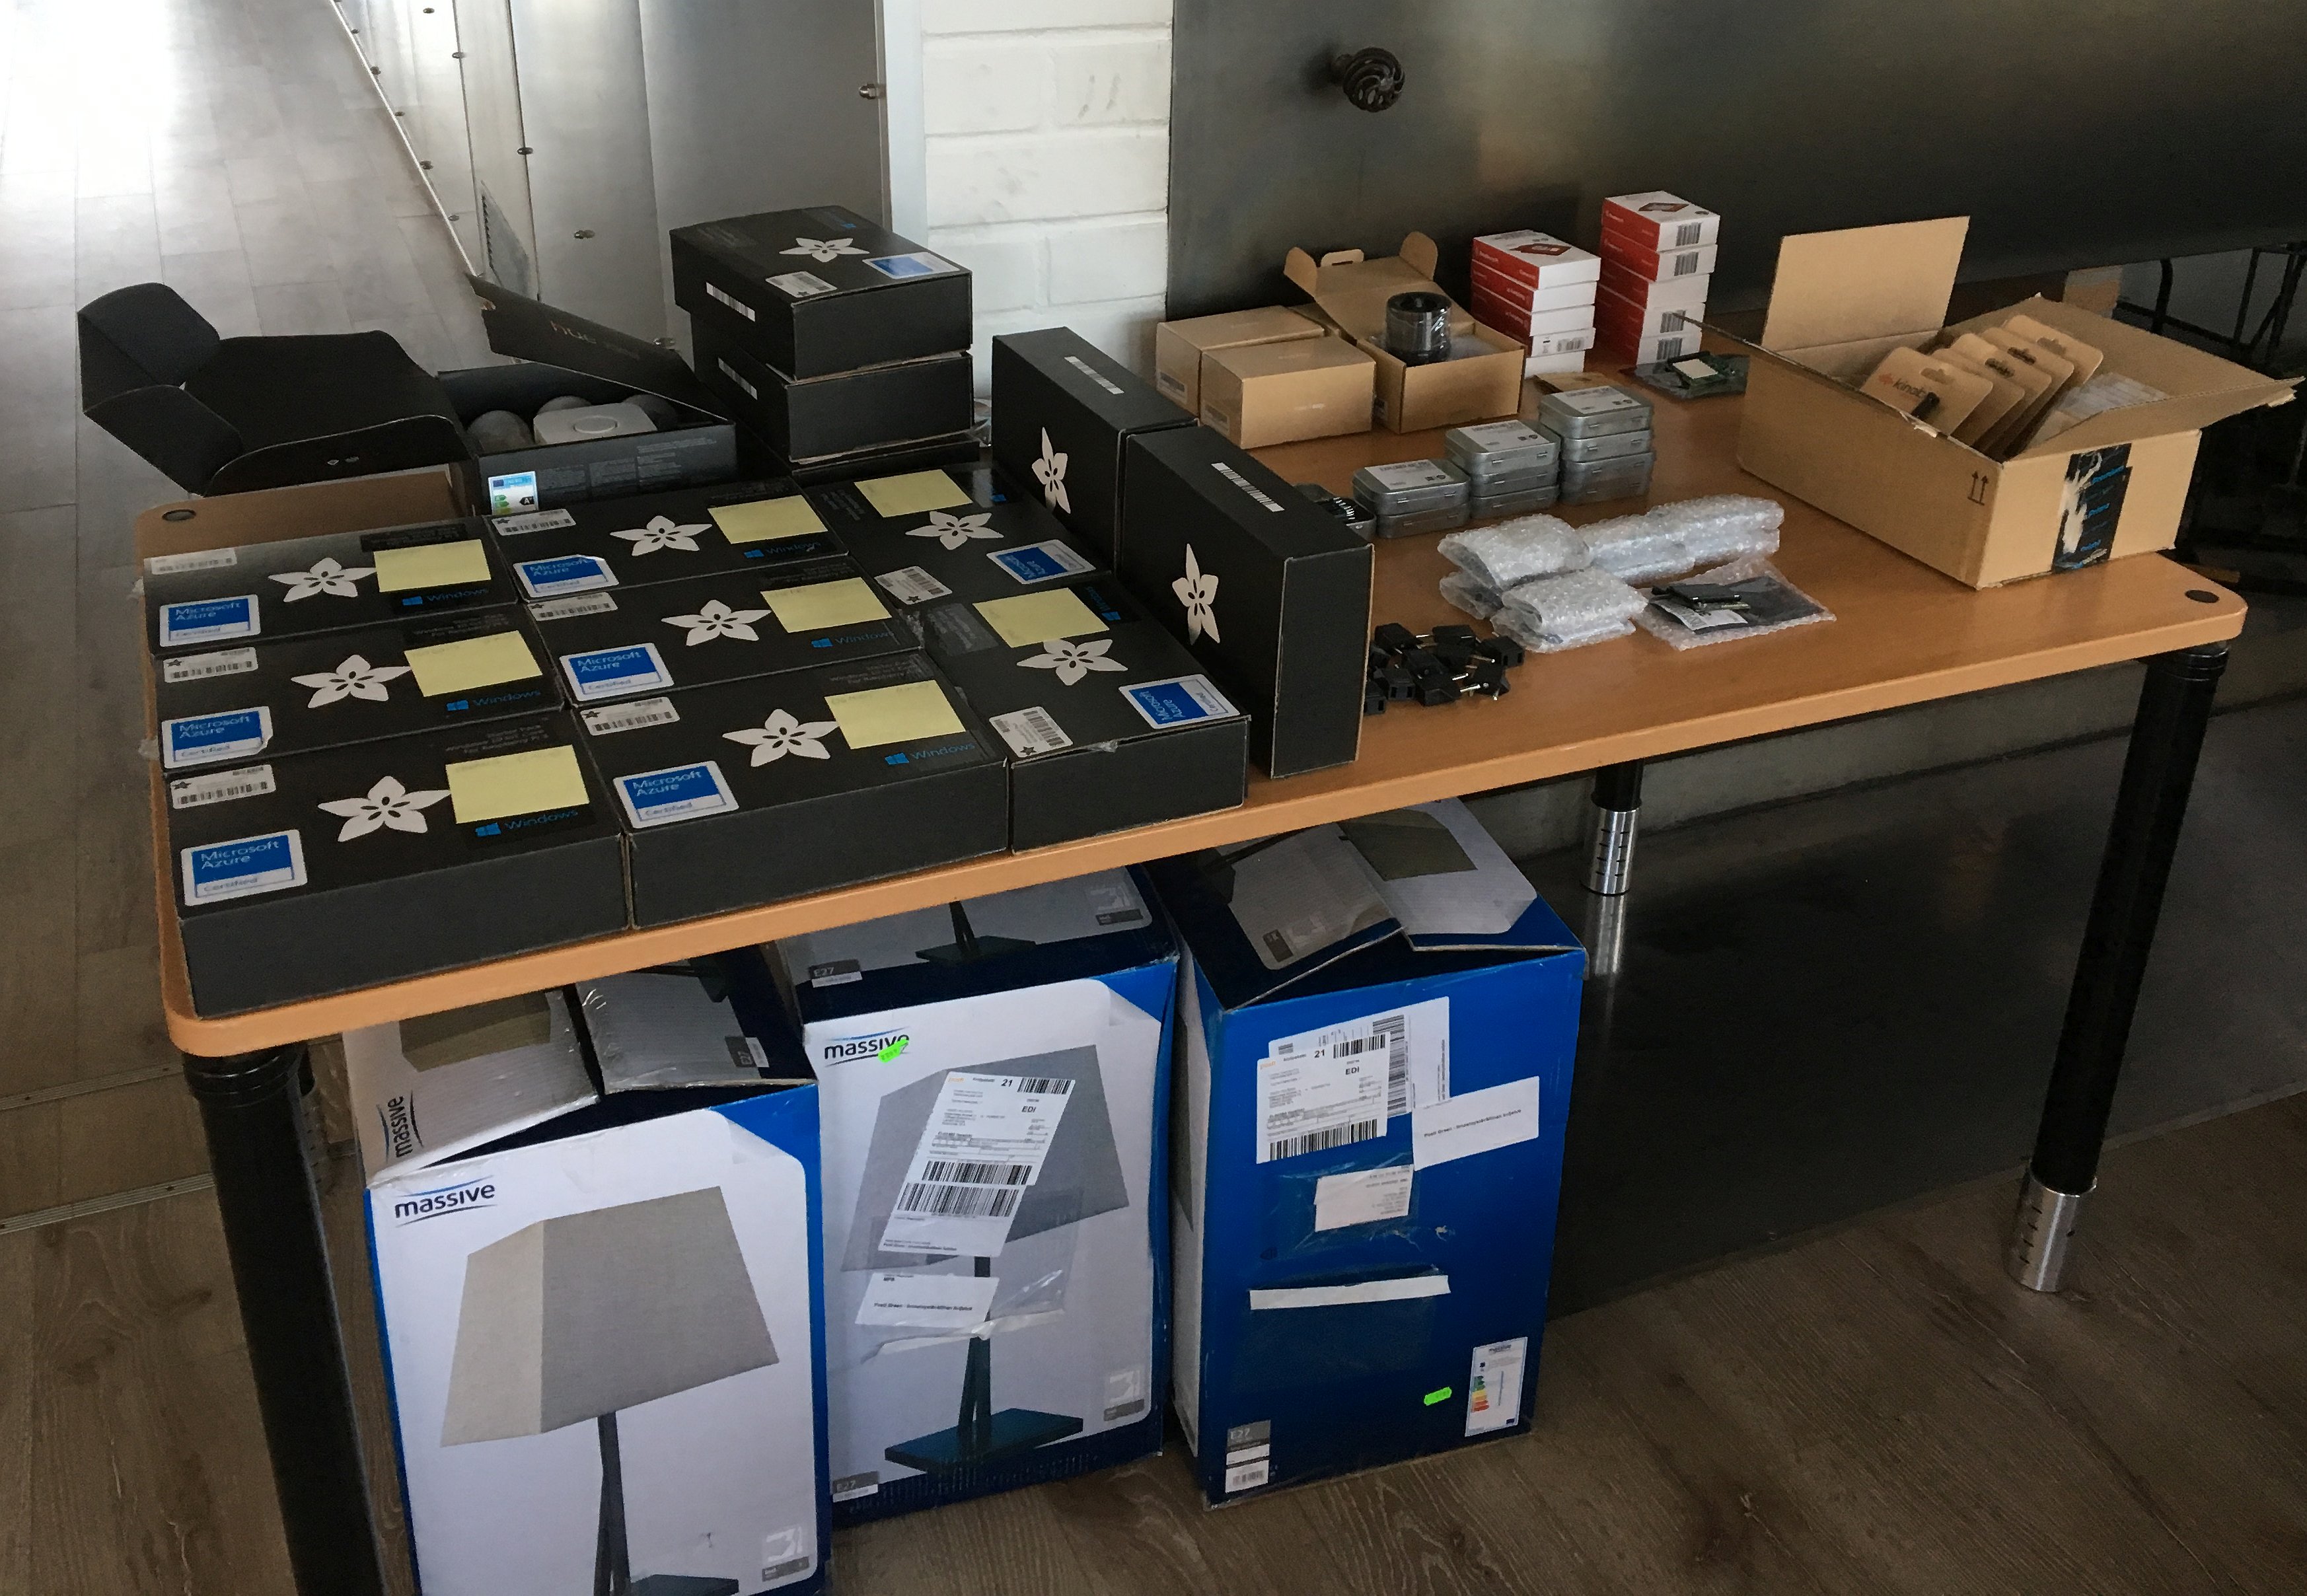
IoT hackathon supplies
So what is on that table?
- Adafruit’s Microsoft IoT Pack for Raspberry Pi 3 with Raspberry Pi 3 computer.
- Some Sense HAT addons
- Some Raspberry Pi cameras
- Couple of Display-o-tron 3000
- Quite a few Parts kit for Explorer Hat (while we did not get the explorer hat, I wanted to get some additional parts)
- BT/3.5mm speakers
- Microphones that work with Raspberry Pi
- Philips Hue Starter Kit
- Lamps (to be used with the Philips kit)
This was the first time I organized anything like this, and of course I did not get the amount of things right. Everybody got a IoT Pack and Raspberry, but I did not order all components for everybody – this was not a problem. But I did order too many parts kits and microphones, for example. But it is not a waste, because the parts can be used later and in other projects as well.
Speaking of projets …
Projects
As I mentioned above, I did some planning ahead of time. I wrote about 6 project ideas, with sub tasks and also extra tasks. The idea behind this was that it might be hard to make up what to do, when you are just getting to know a new technology / computer / system / etc. My original list included:
- Bluetooth presense sensing. Log who is present, and how long, based on Bluetooth signals.
- Meeting room display. Based on a calendar/schedule, make a display that is to be used by the door of a meeting room, that can tell you if it is free or not, when is the next appointment, etc.
- Sensor dashboard. Log a lot of sensors and do something with the readings – visualize, etc.
- Alarm system (motion, camera, sound)
- Parking system – detect license plates with the camera, allow entry or require payment, etc
- Voice controlled lights – The lights become more red as the noise level rises
I decided to list them here if somebody needs ideas for his own hackathons.
But what were the projets we ended up doing?
Sensor data processing with Raspberry Pis and Windows Azure
The Windows IoT Core “team” decided to use Sense HATs and do some sensor data processing. If you are unfamiliar with Windows Azure, the following paragraph could be hard to understand 🙂
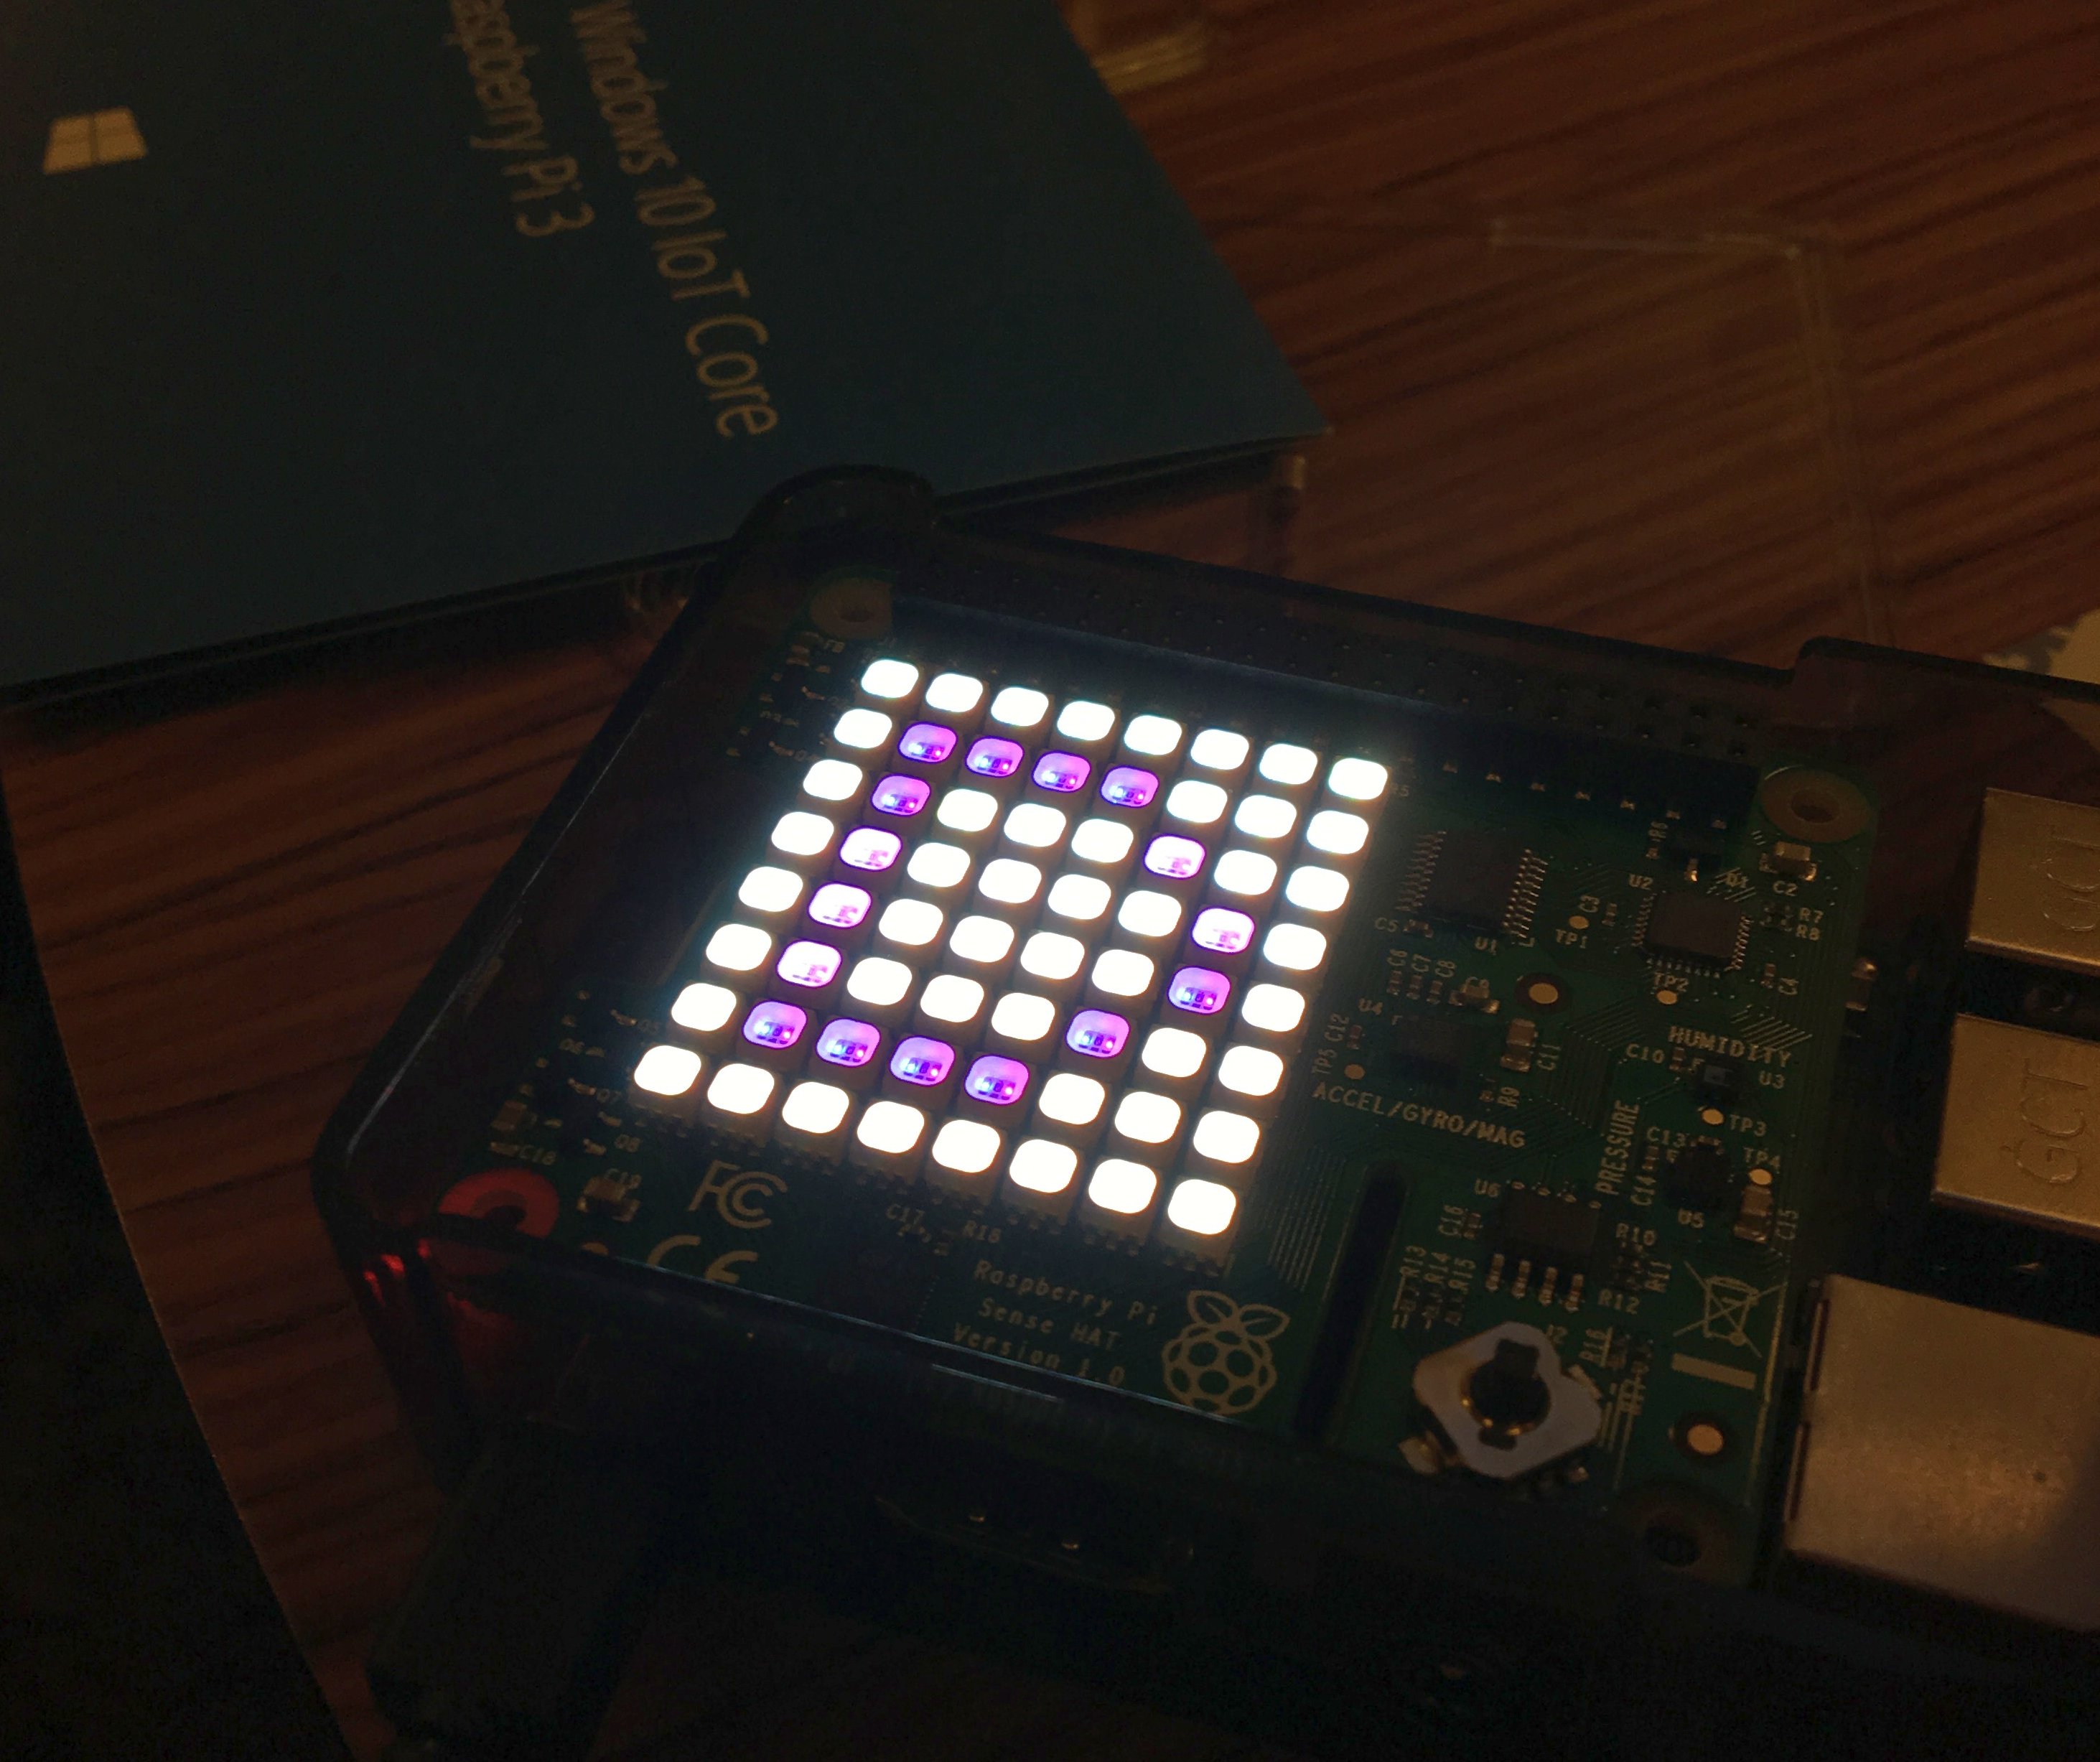
One Pi read the values and sent them 2 times per second to an Azure Function. This in turn pushed that to IoT Hub and Stream Analytics to create 10 second average readings from these values. These values were then stored in Azure Blob Storage. A second Pi read it from there, and visualized it using the Sense HAT. Although the two Pis sit on the same table, the data had to travel quite a distance before getting visualized.

Raspberry Pi showing temperature and humidity
In the picture above the red pixels represent temperature and the blue leds are humidity.
However, as the two Pis were on a table, the measurements did not really change. How do you show the system is working?
Luckily, every good hackathon has a fridge full of beverages and beer/cider cans, so we took some Pepsi Max and Crowmoor cans and put them around the Pi that was doing measurements. It didn’t take long for the temperature to drop. It still took a while for this to be visible, because the display unit shows 10 second averages. But after a couple of minutes the temperature dropped several degrees (several red dots disappeared). At the same time the humidity raised a little, but not much.
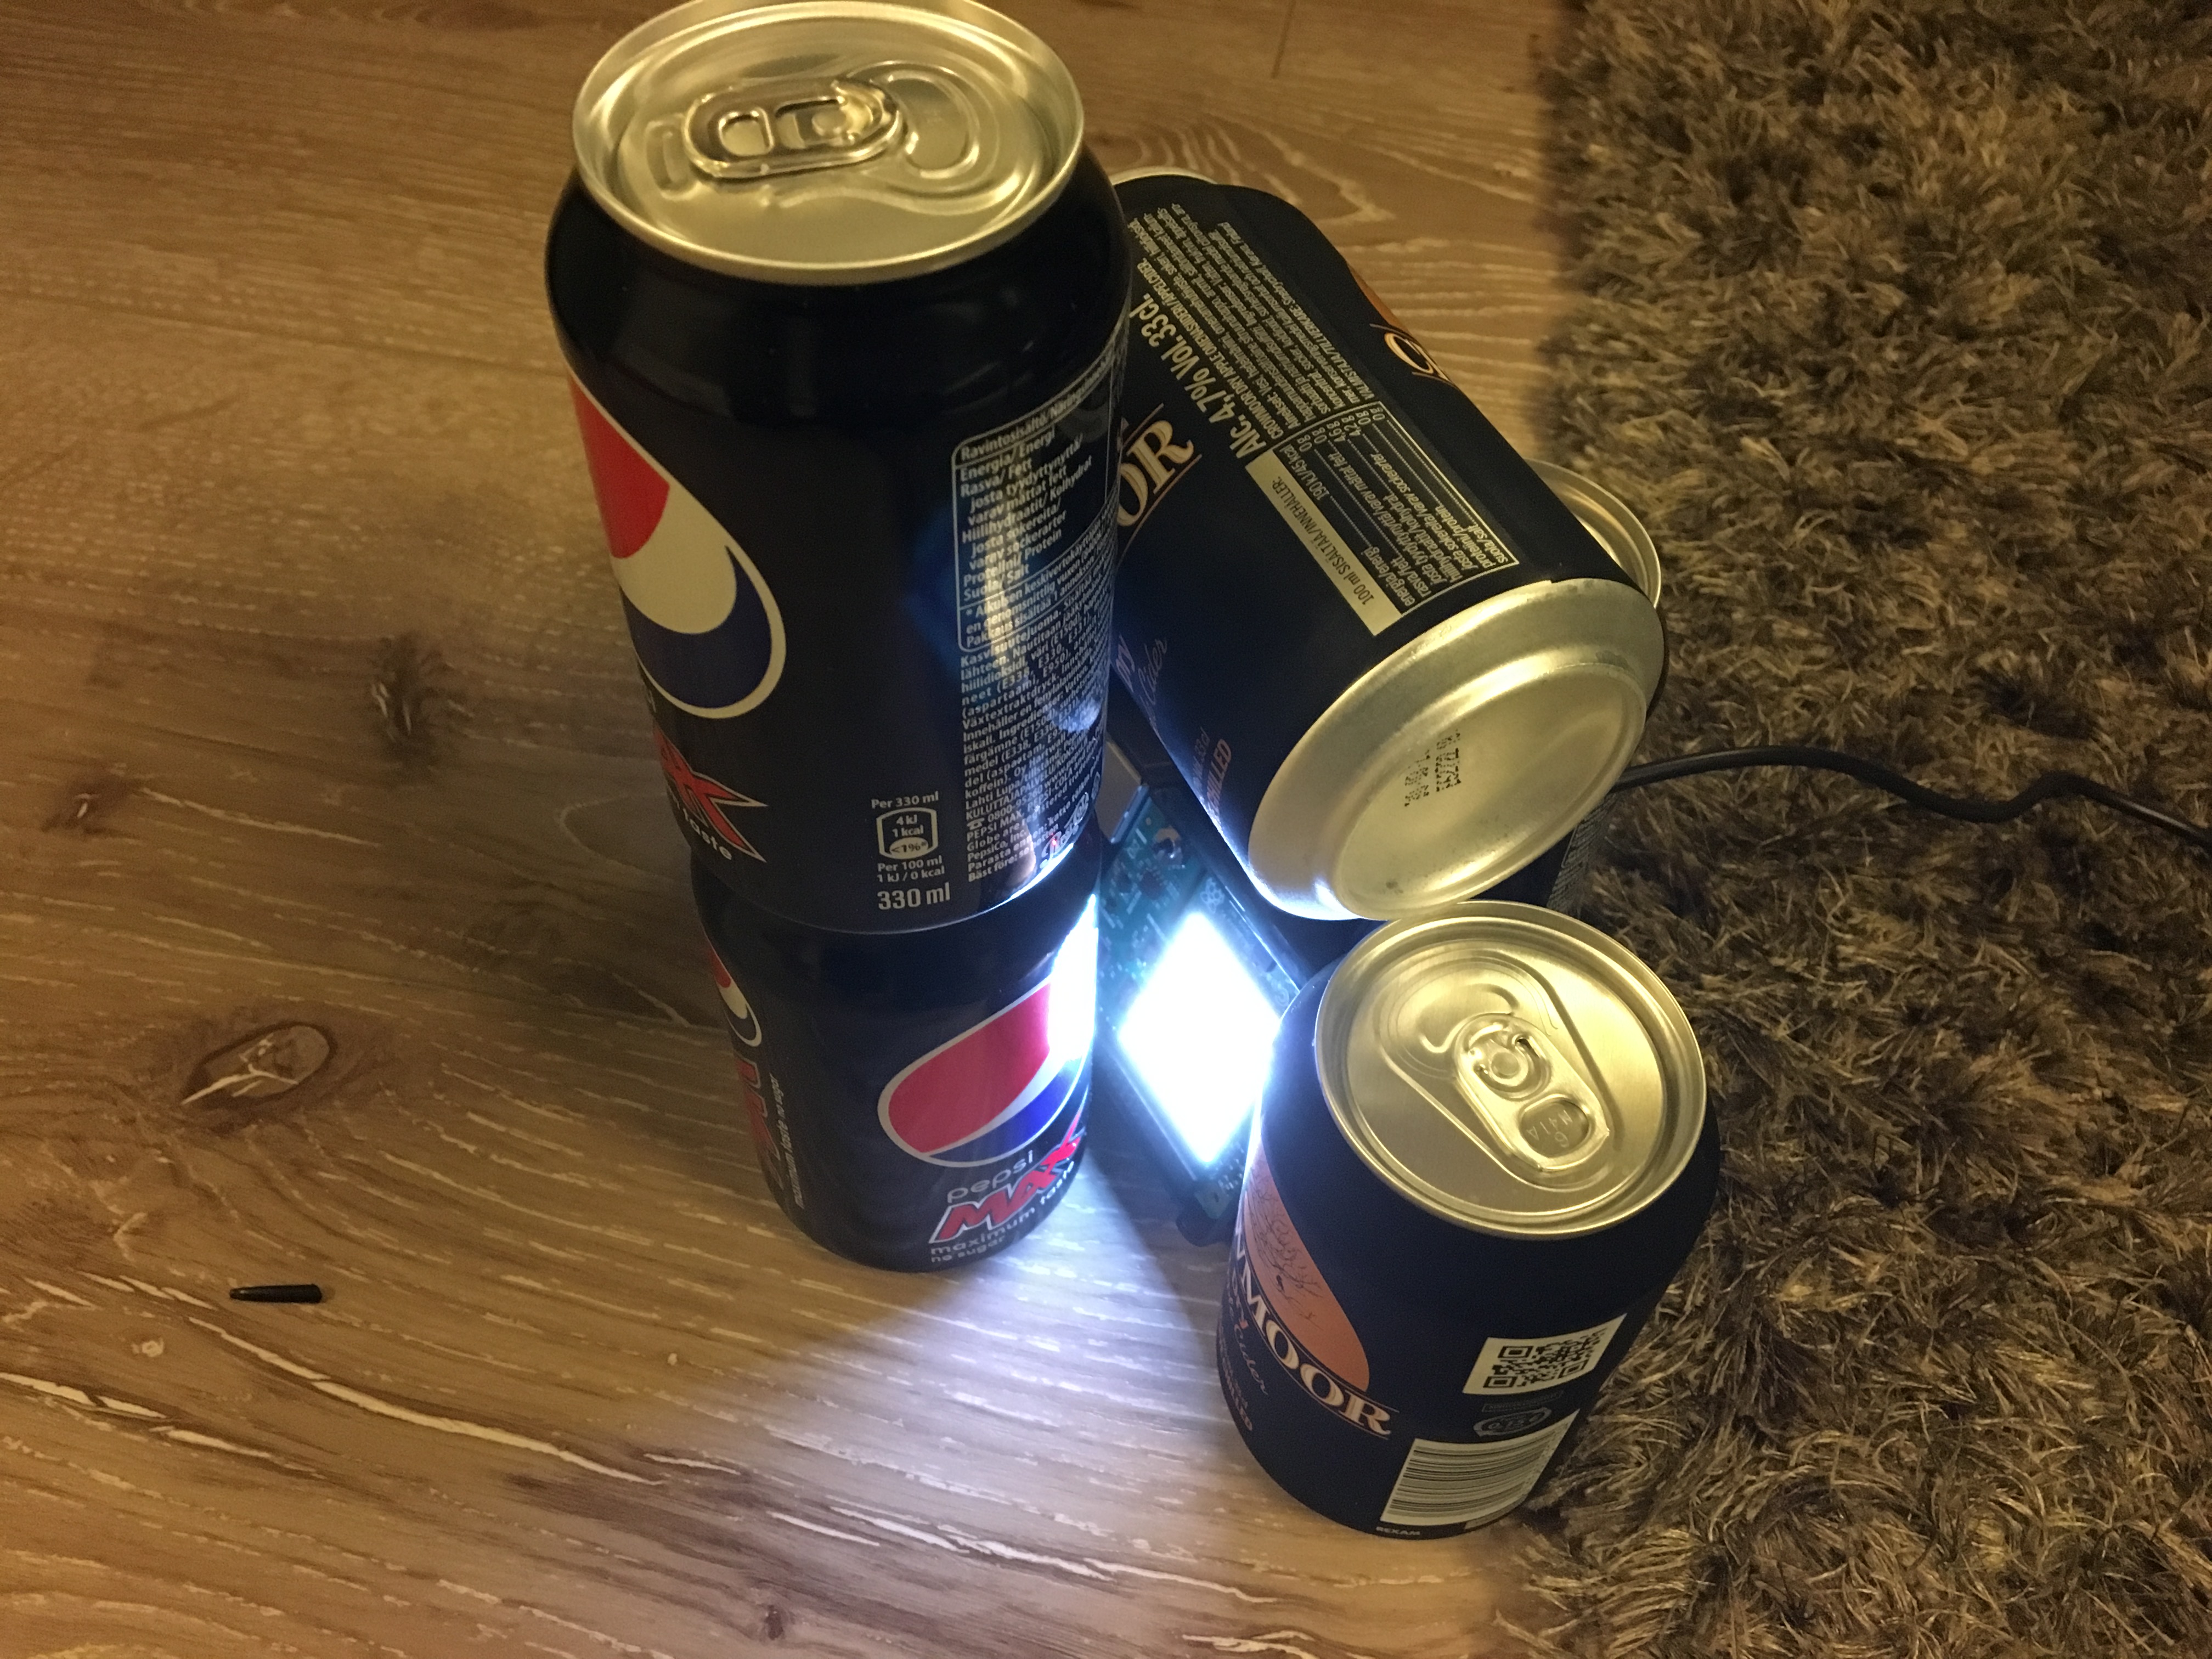
Cooling system
To solve the humidity problem, one of the team members took the measuring Pi and breathed onto the Sense HAT for ten seconds. That raised the humidity pretty fast and pretty drastically!
When the measuring Pi was then left on the table, readings normalized after a few minutes and you could see the pixels gradually changing back to what they were before the demo.
Visual communication with Sense HAT and Raspberry Pi camera
A two person team came up with their own project idea. The SenseHAT has lots of leds, and so it could be used to show data (bytes and bits). The bit pattern could then be read using a camera connected to another Raspberry Pi. A single Pi can both show data and read it, but two of them could be used for “wireless” or light based communication!

SenseHAT and camera
They decided to light up the upper left corner blue, the lower right corner green and the bit pattern in red. This way the blue and green bit can be used to orient the picture. That meant 2 LEDs down, 62 to go.
The 62 remaining LEDs can be used to show 7 bytes of data (56 leds/bits).
The remining 6 LEDs were used to add some error correction / check bits to the system, that would be able to automatically correct a 1 bit error.
The team got the data display part working pretty quickly. They used Python to implement this. You just gave the program some data and it started showing bit patterns right away. See the video below of how this looked like in action.
However, the identification of the bit patterns did not go quite so well, because it was slower. The Raspberry Pi camera took the picture, and using the green and blue leds they extracted the relevant part of the picture that contained the SenseHAT led matrix. However, when they started to interpret this picture it was very slow, mainly because of the image processing library they elected to use in Python.
In the end the project became more of a proof on concept (but hey, it still it works!). Because of time constraints the real time two way communication demo was not completed. I still find this a very interesting project, one that I am tempted to try and implement myself.
See bit patterns changing in the following video.
Alarm system
I initially did not know if I will have time to do anything during the hackathon. I had lots of other responsibilities as organizer, and I did not want to join a team: I might not be able to commit enough time to help the others. And I was pretty busy during the first half of the hackathon, but in the afternoon I got some time freed up, so I decided to do something myself.
In the end, I ended up making a simple motion sensing alarm, that made a sound and took a picture.

Alarm system
I was working on a glass table, so that is why the picture is a little messy. As soon as the motion sensor detected motion an alarm sounded (I choose the red alert sound from Star Trek: The Next Generation). After about 1 second, the Pi camera took a picture and saved it with a timestamp in the filename. If movement stopped, the alarm stopped as well.
Although not as complicated as I wanted it to be, I had a lot of other things to do during the event (including averting a problem with a production system in the middle of the hackathon), so I am still happy I got to do this little project.
Voice controlled lights
I procured a Philips Hue starter pack for the Hackathon. This contains three wirelessly controllable lightbulbs and a “router”, which is the heart of the system. The idea of this project was to control the lights based on voice levels. As the voice gets louder, so do the lights change.
The Hue has a great REST API that is easy to use from any language.
The team had some problems getting the microphone and audio recording working in Python, but they managed to do it in the end. They record about 5 seconds of audio, and based on that decide the sound level. And the green light turns first yellow, then orange, then red, as the noise level goes up.
They also integrated the Display-o-Tron 3000 to show the decibel readings their application was processing.
The team wanted to integrate motion sensors to turn the lights on or off, but they ran out of time while trying to work around a bug they had. Still, a very nice project!
Learning with LEDs
Not everyone is a coder, or has the dedication to implement a bigger project when faced with new technology. Two participants decided to try out Windows IoT Core and Raspbian and have some LEDs light up, test how to write code and deploy. In the end, they were pretty satisfied with the results – and so was I, because that was my goal, to have people learn new things and enjoy it.
Final thoughts
This has been a great day for us all. I got tons of experience organizing these kinds of events, and I was happy to receive positive feedback in the end. Everybody learned something, and as bonus, people got to keep the Raspberry Pi 3 for themselves if they wanted to.